How to change Display Settings?
Print
Modified on: Thu, 30 Mar, 2023 at 12:39 PM
If want to display messages or options to your visitors while they visit your store?
We provide the Display Settings feature to the admin so that admin can choose the display message option and change the settings of color, image, text, style, animation, etc.
Start Changing display settings from here:-
Basic Settings=> The image upload-related settings are available here.
1) Display Message to Customer via=> Select an option from Popup Box and Bar. This will display your message in the popup box and top bar.
2) Enter Redirect Message=> Provide the message which will be displayed to your visitor when they visit your site.
3) Enter Yes Button Text=> Enter the Yes button text which will be displayed in the popup box and bar.
4) Enter No Button Text=> Enter the No button text which will be displayed in the popup box and bar.
Note:- You can use the {{COUNTRY}}, {{STORENAME}}, and {{IP}} keys in the Message, Yes Button text, and No button text fields. The {{COUNTRY}} key is used to display the Country name of the visitor.
The {{STORENAME}} is used to display the Store Name which you want to redirect your visitor.
The {{IP}} is used to display the current IP address of the visitor.
5) Display Country Flag on Popup Box=> If you want to display the Flag of the country in which your visitor will be visiting. Click on the Yes button to enable this setting.
6) Select Country Flag Width=> Here, you can set up the Flag Width.
7) Enable Cookie Settings=> If you don't want to display Popup Box and Bar multiple times to your visitors then you can set this option to Yes. When the visitor clicks on the Yes/No button then the user selection will be saved on the cookie and next time popup box/Bar will not be displayed.
8) Display Remember Checkbox on Popup Box =>If you want to display the checkbox in the Popup box, so when the visitor checked the checkbox, the popup box will not see again.
9) Click on the Save Settings button to save the changes.
Note: To use this setting you first need to enable the Enable Cookie Settings option.

Image Settings=> The image upload-related settings are available here.
1) Show image on Popup Box=> If you want to display your site Logo or image on Popup Box then click on the Yes button to enable this setting.
2) Show image on Popup Box=> Upload Image from here which will be displayed in Popup Box.
3) Select Image Width=> Enter the standard width of the Image.
4) Select Image Height=> Enter the standard height of the Image.
5) Click on the Save Settings button to save the changes.

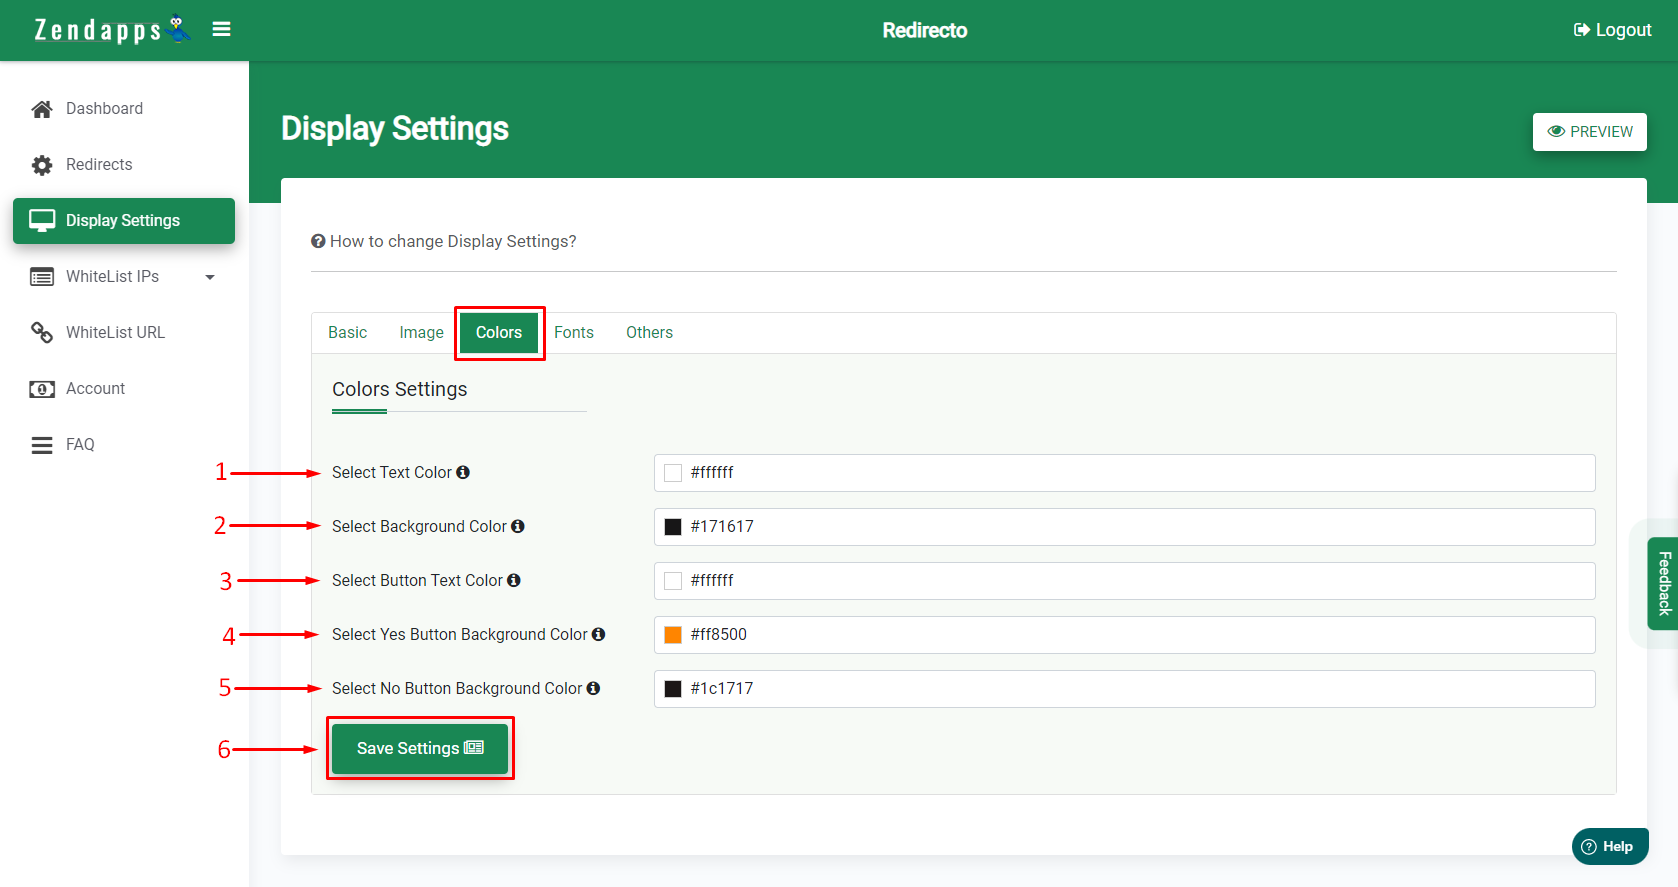
Color Settings => There are all types of color settings are available.
1) Select Text Color=> Select the Message Text Color.
2) Select Background Color=> Select the Background Color of the Popup Box and Bar.
3) Select Button Text Color=> Select the Buttons Text Color.
4) Select the Yes Button Background Color=> Select the Yes button Background Color for Popup Box and Bar.
5) Select the No Button Background Color=> Select the No button Background Color for Popup Box and Bar.
6) Click on the Save Settings button to save the changes.
Font Settings=> There are all types of Font settings available.
1) Select Font Size=> Select the font size of the Message.
2) Select Button Font Size=> Select the font size of the Yes/No Button.
3) Add Google Font=> By clicking Yes, you can use the Google Font.
3) Select Font Family=> Select the Font Family for the Popup Box and Bar.
5) Select Line Height=> Select the Line height of the Message.
6) Click on the Save Settings button to save the changes.

Other Settings=> Here are some other settings.
1) Select Popup Model Border Radius=> Select the Popup Box Model Radius (in Pixel)
2) Select Animation Effects=> Select an Animation Effect for a popup Box/Bar.
3) Select Popup Button Position=> You can select popup position.
4) Enter Custom CSS=> Enter your Custom CSS here.
6) Click on the Save Settings button to save the changes.

Preview=> Click on the Preview button to display the preview of the Popup Box/Bar.

Now view your store and check the settings.
Did you find it helpful?
Yes
No
Send feedback Sorry we couldn't be helpful. Help us improve this article with your feedback.